One of the first things to get to grips with when considering installing Shelly devices is how your light switches are wired because this can impact what smart lighting tech will work for your situation. Not all smart light switches will work with all wiring configurations.
How Do I Know If I Have Neutral Or No-Neutral Wiring?
In the UK, two types of wiring configurations are typical: neutral and no-neutral.
With neutral wiring, the back box for your light switch will have access to neutral, live and CPC (earth). Most smart light switch products require access to power, and with neutral wiring, you have full access to power within your back box without having to run any additional wiring. The full range of Shelly devices, including the Shelly 1L, Shelly Dimmer 2 and Shelly i3 can be installed behind a light switch with neutral wiring.

Switch with neutral (blue), live (brown) and CPC (green/yellow).
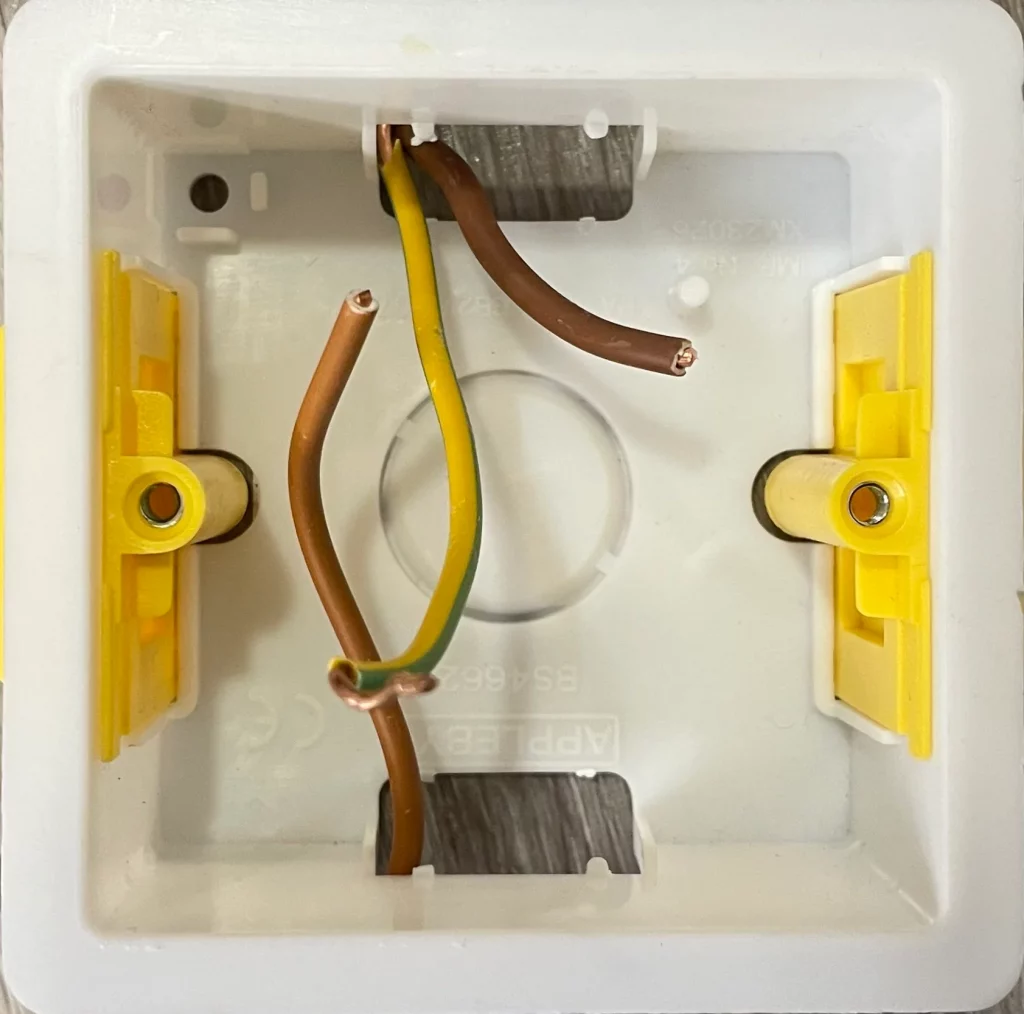
With no-neutral wiring, the back box for your light switch will have access to live and CPC (earth). There will be no neutral wire present in the back box. Most smart light switches cannot be installed without a neutral supply because they cannot be sufficiently powered. However, the Shelly 1L and Shelly Dimmer 2 can be installed behind a light switch without neutral wiring. If the total load of the lights you wish to control is less than 10/20W, you will also need a Shelly Bypass.

Switch with no-neutral wiring, live (brown) and CPC (green/yellow).
Installing a Shelly Without Neutral Wiring
The steps described below are designed to give you an impression of what’s involved in installing a Shelly without neutral wiring.
Disclaimer: Remember that electricity can kill, and we always recommend using a qualified electrician and following your local laws and regulations for working safely with electricity.
Step 1: Safely Isolate Power
Safely isolate the power at the consumer unit to the lighting circuit that you will be working on and use a voltage tester to ensure that power has been properly isolated and that the circuit is safe to work on.
Step 2: Identify the Switched Live
In a typical no neutral setup you will have 3 live wires within your back box:
- Feed In will be bringing the live feed into the back box from an upstream source (such as from your consumer unit or a light switch in another room).
- Feed Out will be supplying a live feed to components downstream of the current switch (such as a light switch in another room)
- Switched Live will provide a live feed to the light fitting when the switch is switched on.
You will need to identify which is your Switched Live.
Feed In and Feed Out will be connected together to make a complete circuit and will provide power to one side of the switch.
The Switched Live will typically be a single feed on the other side of the switch. Your Switched Live wires sometimes use colours other than brown that you would usually associate with live. In some cases another colour wire (such as blue, grey or white) may be used, but a piece of brown sleeving will be applied to indicate that this is the Switched Live.
Note: There are many different wiring configurations, what we’ve described here is one of the most common configurations. It is possible that your switch may be wired differently and that you will need to follow alternative steps to identify the switched live.
Step 3: Install the Shelly Behind the Switch
Pick which Shelly device you want to install behind your light switch. In most cases you will need a Shelly 1L or a Shelly Dimmer 2.
The Shelly 1L can be used with a standard light switch where you do not want to dim the light.
If you have a dimmable light fitting then you will want a Shelly Dimmer 2 which supports dimming the light.
Shelly 1L
The Shelly 1L will need to be wired as follows:

- L will need to be wired to your permanent live Feed In.
- O will be wired to your Switched Live feed.
- The Shelly 1L has two inputs (SW1 and SW2) which can be used to toggle the light. Your light switch should be wired to SW1 and Sx so that when the switch is closed a circuit will be completed between Sx and SW1.
Shelly Dimmer 2
The Shelly Dimmer 2 will need to be wired as follows:

- One of the L terminalswill need to be wired to your permanent live Feed In.
- O will be wired to your Switched Live feed.
- The Shelly Dimmer 2 has two inputs (SW1 and SW2) which can be used to toggle the light and/or increase and decrease the brightness. Your light switch should be wired to SW1 and one of the L terminals so that when the switch is closed a circuit will be completed between L and SW1.
Step 3: Install a Shelly Bypass
With no neutral wiring a Shelly Bypass may be required.
- Shelly 1L requires a bypass if the load is less than 20W
- Shelly Dimmer 2 requires a bypass if the load is less than 10W
Connect the Shelly Bypass in parallel to the load as shown below:

Step 4: Installation Complete!
Your Shelly device is now installed and ready to use. Once you have turned back on the power to the lighting circuit you will be able to use your light switch just like you did before. You will also be able to use the Shelly Cloud app to control the switch from your smartphone!
Checkout our guide on How To Configure a Shelly with the Shelly Cloud App.