Home Assistant Guides & Troubleshooting
Disclaimer: While we provide devices pre-installed with Home Assistant, further knowledge is still required to configure the various integrations and add-ons. While we will do our best to support device issues we cannot feasibly provide support for software, integration or add-on issues. If the device is booting and generally working then there is a good chance other issues relate to configuration.
Getting started with Home Assistant, and more!
We will add to this page over time, please get in touch if you have specific queries.
HAS Models
If you've just received a HAS this Guide will help you get up and running by getting the HAS on the network.
Wired Ethernet is the most straight forward. Connecting a monitor is optional if you can find the IP by other means such as the DHCP leases table on the router (advanced).
- Connect it to a monitor and keyboard (Ethernet is optional but recommended)
- Power up the HAS
- On boot you will be given the IP address if connected to Ethernet. If this is the case move on to the next section.
- If needed, connect to WiFi by:
- Run network interfaces to find your wireless interface (eg wlp2s0)
- Run network scan [interface] to check your network is visible
- Run network update [interface] --wifi-auth wpa-psk --wifi-mode infrastructure --wifi-ssid XXX --wifi-psk ZZZ (the exact settings will vary based on your wireless network)
- Using the IP provided, connect to the web interface from a computer or tablet (ie http://192.168.1.163:8123)

- From there follow the Onboarding Guide
Initial Setup
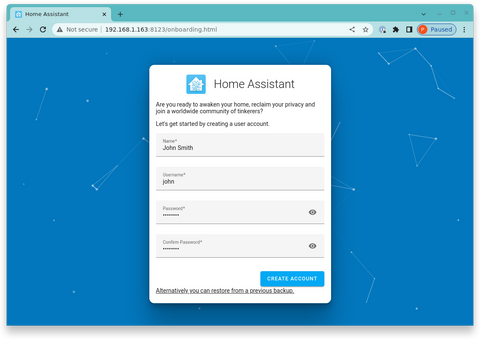
- In a browser (on a computer, tablet or similar that is on the same network as the HA server) navigate to the the IP of the device with the Home Assistant URL port. For example, based on the screenshot above http://192.168.1.163:8123

- Enter your name, username and desired password:

Then click Create Account.
- Set your location, language, time zone, etc:

The click Next.
- Set your data preferences:

And click Next.
- Optionally, you can start setting up devices from here, or click Finish:

- And that's it - we're in!

- At this point it would be wise to set a static, memorable IP that does not conflict with any other devices on your network (eg 192.168.1.200) so that you can always easily navigate to it.
DHCP lease durations vary and the IP may change at times otherwise.
Common Problems
I can't access it
Connect the device to a screen and start it up - see what IP address it has (like the getting started guide) and try to access that from the browser.
If the device boots but has no IP or is not accessible it is likely a networking issue.
If the device does not boot to the ha > prompt then get in touch.
I forgot my password!
- Connect a screen and keyboard to the device
- Start it up and wait for the ha > prompt.

- Run the following command:
auth reset --username your-username --password yournewpassword
- Try and log in again using the web interface, http://192.168.1.163:8123 in the examples above.
I forgot my username!
- Connect a screen and keyboard to the device
- Start it up and wait for the ha > prompt.
- Type login and press enter. You should see a prompt starting with #

- Search for usernames in the data directory. With our devices the data directory is at /mnt/data/supervisor/homeassistant
You can run df -h to try and determine your data path:
- Search for usernames by running:
grep username -r /mnt/data/supervisor/homeassistant/.storage/auth
Note: You can use the tab key to complete paths, after typing
grep username -r /m
Press tab, it should complete to grep username -r /mnt ... then type another forward slash and d s you have
grep username -r /mnt/d
Then press tab again, and so on - this helps ensure long paths are not misspelled
The result should look as follows:
As we can see here, we have a user called john. Using this knowledge we can type exit to leave this shell and return to the ha > prompt. Then if needed we can reset John's password as described above.
I forgot my username and password!
- Connect a screen and keyboard to the device
- Follow the "I forgot my username!" guide above.
- Then, follow the "I forgot my password!" guide above.
- Make a note of your username :)
I want to reset my configuration!
The following steps are not part of any official guidance and as a result results may vary:
- Connect a screen and keyboard to the device
- Type login and press enter.
- At the prompt run:
rm -Rf /mnt/data/supervisor/homeassistant/* /mnt/data/supervisor/homeassistant/.*
Example:
The can't remove errors are fine.
Leave the shell with exit then when at the ha > prompt reboot with host reboot
- Good luck!